Adding the Border
I wanted to add my Cecile Brunner rose to the border of the quilt, but the light pink color of the rose just wouldn't work, so instead it's just going to be a climbing red rose. I will, of course, add a few critters to the border, so stay tuned.
This post is for all of you who are making the quilt. For those of you who are making pillows, you will have to wait for the next post that will cover the applique that will be added to the border. This post will show you how to piece the border and add the ribbon branches.
Check out my instagram feed at butternut_plaid If you want to see what's coming up next.
You should have fabric left over from making the first blocks, but it's not necessary to make the borders. Just use fabric that works well with your existing fabric blocks. It's your chance to be creative.
You will need
- Border
- 3/4 yard of 44"-45" wide cotton - Fabric C (See the first post on Jan 15 if you can't remember which fabric is which.)
- Corner blocks
- 1 fat eighth cotton - Fabric B
- 1 fat eighth cotton - Fabric D
- 3 1/2 yards of 3/8" wide green cotton ribbon - climbing rose branch
- 1 1/4 yard of 1/4" wide green cotton ribbon - rose stems
- Pins to secure ribbon branches and stems
- Chenille needle, size 24
- Perle cotton, size 12 in a green that matches or complements the green ribbon branch. (2 strands of floss can be substituted for the perle cotton).
Note: If you don't have access to coordinating ribbon you can cut strips of green wool and link them together with cross stitches to make the long branches. They needn't be the same color green. In fact, a variety of greens would make a wonderful rose branch.
Instructions - All seams are a scant 1/4".
- Cut
- Four 6" wide x width of fabric (44" - 45") strips of Fabric C. Trim off selvage edges. Do not make less than 41".
- Eight 3 1/4" x 3 1/4" squares of Fabric D.
- Eight 3 1/4" x 3 1/4" squares of Fabric B.
2. Sew
- Layer one Fabric B square on each Fabric D square, right sides together, making eight pairs.
- Sew each pair of fabric squares along one edge making eight 2 patch rectangles. Press seams open.
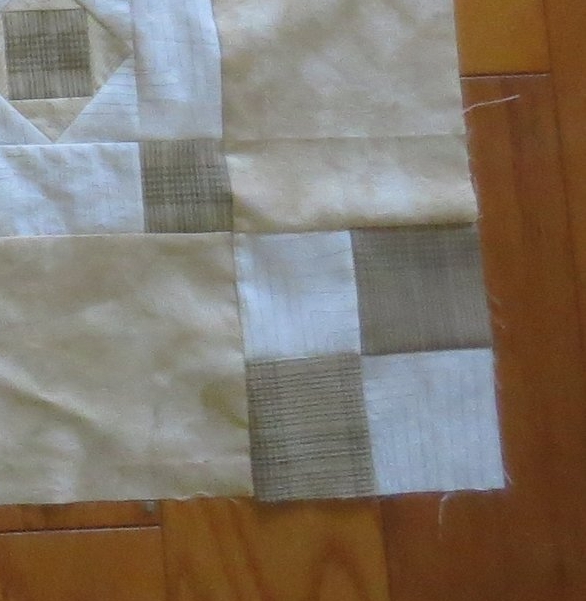
- Lay one 2 patch rectangle, right sides together, on another 2 patch rectangle making sure that a Fabric B square lies on a Fabric D square and vice versa, so that the final 4 patch is a checkboard pattern (see below). Sew along one 6" side. Press seams open. You should now have four 4 patch squares that measure 6" x 6".
- If you haven't done so already, square up your quilt edges. My quilt measures 40" square. Yours may vary, but don't worry if it's not the same as mine. Just make sure it's squared up and then measure the right and left sides (they should be the same). Write that number down! You gonna need that information in a minute.
- Sew one of the 6" strips to the bottom of the quilt. Trim off excess. Press the seam open.
- Sew another strip to the top of the quilt. Trim the excess and press the seam open.
- Now, remember that number I told you to write down? Cut your next strip to that length. In my case it was 40". The 1/4" seam allowance is included in that length, so you don't need to add it.
- Sew one 4 patch block to each end of each strip, making sure that you orient the corner blocks so that the Fabric D square (light color) is in line with the sashing corner block (see below).
- Sew one corner block/strip to each side of the quilt. Press seams open.
- Ribbon Branch
- Cut the 3/8" wide ribbon into the following lengths:
- 13"
- 35"
- 75"
- Cut the 1/4" wide ribbon into the following lengths:
- one 3"
- three 4"
- two 5"
- two 7"
- Position and pin the 75" piece on the top, left, and bottom of the quilt using the picture as your guide.
- Cut the 3/8" wide ribbon into the following lengths:
- Use the 13" piece to make a branch off of the 75" piece, beginning approximately 15" from the bottom end (see below). Tuck the bottom end of the branch under the longer ribbon. Pin in place.
- Position and pin the 35" ribbon on the right side of the quilt using the picture as your guide.
- Position and pin the stems of the roses and leaves, in order, from top to bottom on the 75" branch as follows: 4", 4", 7", 5", and 3". Tuck the bottom ends under the ribbon branch. Use the picture as your guide for placement.
- Position and pin the stems on the 35" branch, in order, from top to bottom as follows: 4", 5", and 7". Tuck the bottom ends under the ribbon branch.
- Whip stitch all branches and stems using one strand of perle cotton, size 12.
You are done!


